|
In december 2011 I bought a vehicle video recoder from
SuntekStore. On their site, the
product is called "Vehicle Sport Car Mini DVR 2.5 Inch TFT Screen
Camera with HDMI" but in the documentation its called "HD720P Portable
DVR Road Safety Guard". In this user manual I will refer to it as a
vehicle video recorder
. The Suntek reference is 14001692.
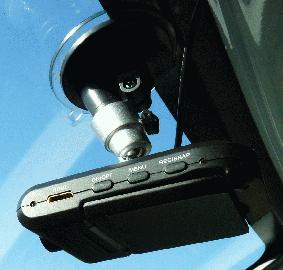
I chose this video recorder for its wide angle, 140 degree "fisheye" lens.
The instructions included with the product are in chinese characters with an english language translation which supposes that the user already understands the product. This page proposes a simple "User's manual" which includes the original instructions and further notes based on my experience.
There is also a french translation.
The vehicle video recorder has a video recording capacity of at least 6 hours using a 16 Gbyte SDHC card. The wide angle lens and the considerable compression of the MJPEG encoding produce some image and geometric deformation which are not a problem for a vehicle video recorder but which would not be acceptable if you are looking for high quality video.
If you need high quality video, choose a less specialised product.
 |
|||
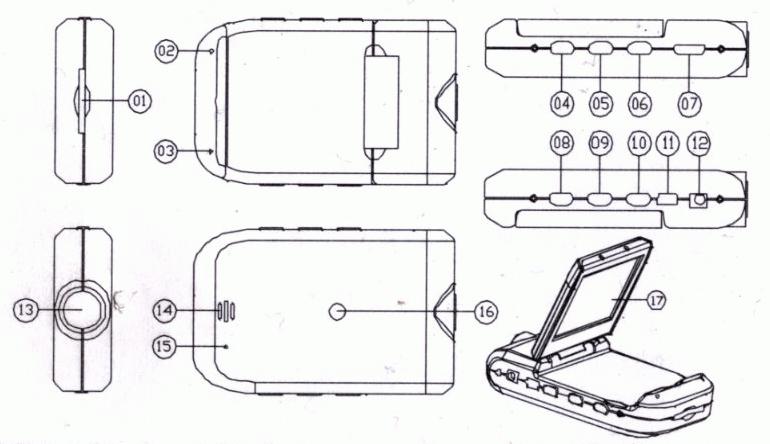
| 1 | Socket for SD/MMC card | 10 | MODE Change mode of operation |
|---|---|---|---|
| 2 | Power on (green) or battery charge (red) | 11 | USB socket |
| 3 | Microphone | 12 | DC5V 5V DC input |
| 4 | REC/SNAP Record video/take photograph | 13 | Lens |
| 5 | MENU Menu | 14 | Loudspeaker |
| 6 | ON/OFF Yes, it's the on/off button | 15 | Product reset hole |
| 7 | HDMI socket | 16 | Mounting screw position, depth 7.5mm |
| 8 | UP Move up in menu | 17 | 2.5 inch LCD screen |
| 9 | DOWN Move down in menu | ||
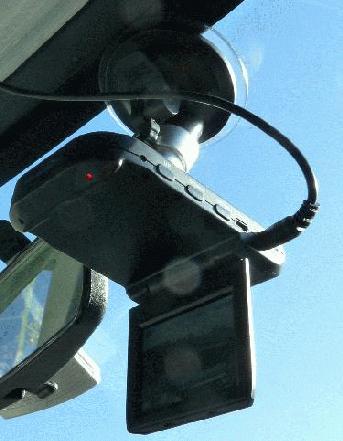
Note that the presentation of [17] of the product with the screen on top is misleading. In normal operation, the screen is below the camera as you see in figure 9.
 → Lens → Lens |
|---|
Lens ← 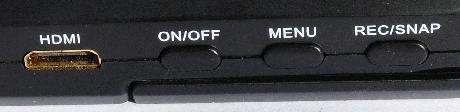 |
![]()
The vehicle video recorder requires an SD/MMC or an SDHC card such as the one shown on the left. This card is not supplied with the product. You have to buy one separately.
The vehicle video recorder operates correctly with a class 10 SDHC card, that is, a card able to perform sequential writes at at least 10 Mbyte/sec. I do not know if it will operate correctly with class 2, 2 Mbyte/sec, class 4, 4 Mbyte/sec ou class 6, 6 Mbyte/sec cards. You will have to experiment to find out.
A 16Gbyte card makes it possible to record 6 hours of video at the maximum resolution of 30 images per second with a 1280×720 pixel image size.
There are two ways of starting and stopping the camera: manually and automatically. In normal operation the vehicle video recorder starts and stops automatically, however this can also be done manually.
If the vehicle video recorder is connected to a 12V socket, the camera starts operation automatically when the car starts. The red indicator [2] lights up because the internal battery is being charged. Note that the vehicle video recorder will start operation if you simply turn the car's ignition contact key without starting the engine. The camera will continue to record until you turn off the motor and the recording period ends. The is the normal operating procedure.
When you turn off the ignition, the vehicle video recorder will continue recording until the current recording period ends, and then the camera will automatically stop.
If you press on the [ON/OFF] button, the vehicle video recorder will begin operating using its internal battery. This is useful for setting up the configuration options. During this time, the power on and battery charge indicator [2] will show a green light.
If you press again on the [ON/OFF] button, the vehicle video recorder will stop operating.
The vehicle video recorder recharges its internal battery if it is connected to a 12V socket, or to a powered USB socket. During the battery recharge, the battery charge indicator [2] show a red light.
When you turn on the vehicle video recorder it automatically enters video recording mode. The files created are saved on the SD/SDHC card.
The recording will stop when the camera is turned off or when you press on the [REC/SNAP] button.
The vehicle video recorder can be used to take photographs. In this case it is common to detach the camera from the suction cap and to remove the power cable. To enter "photo" mode press [ON/OFF] to start the camera, and then press [MODE] to enter "photo" mode. A small icon representing a camera appears in the top right hand corner of the screen.
Once you are in "photo" mode, press [REC/SNAP] to take a photograph.
 |
|---|
The vehicle video recorder can also play back photos and videos from the SD/SDHC memory. This playback function may be useful while travelling, it is ofter easier to manipulate the files either by the connecting the camera to a computer using the USB cord, or by removing the SD/SDHC card from the camera and placing it directly in a computer.
To enter playback mode, press [ON/OFF] to start the camera, and then press twice on [MODE] to enter playback mode.
To select the file to be viewed press on [UP] and [DOWN] to find the directory and then on [REC/SNAP] to enter the directory,
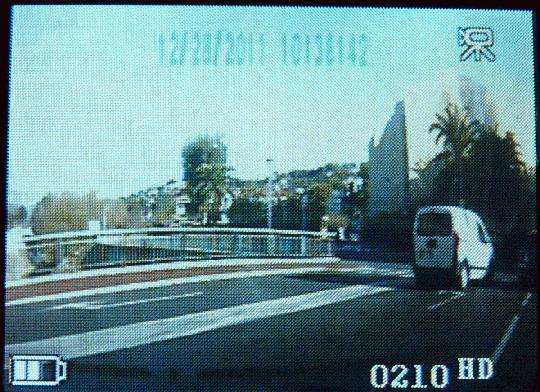
If the file is a video, You can view it by pressing [REC/SNAP]. The video is identified by the date mm/dd/yyyy and the time hh:mm:ss included in the video. For example you can see 12/28/2011 10:38:42 in the screen capture. The "0210" in the image means that the file is found at the address DCIM → 100DSCIM → REC_0210.AVI in the SD/SDHC memory.
If you view a photo, the identification number, for example 0214, means that the photo is at the address DCIM → 100DSCIM → JPEG0214.JPG on the SD/SDHC card.
| Play |
|---|
| Delete |
| Format |
To delete a video that you have selected, press [MENU] to enter delete mode. You will see the sub-menu shown in figure 6. Use buttons [UP] and [DOWN] to move within the sub-menu, and then press [REC] to indicate your choice. You will see the confirmation request shown in figure 7. Press [REC] to confirm your choice.
| Cancel |
| Execute |
To reformat the SD/SDHC card, choose the option FORMAT and then press [REC] to confirm the reformat. Warning: It is very easy to end up reformatting the SD/SDHC card when all that you wanted was to delete a recording. The reason is that in the deletion sub-menu of figure 6 it is not clear which of the two fields has been chosen. the grey field?, or the clear field? If you think it's the clear field then you are mistaken. because the chosen field is greyed. How many times has the SD/SDHC card been reformatted in error because of this ambiguity?
To leave the delete sub-menu press [MENU] to return to playback mode.
| Video Setup |
|---|
| Video Size |
| AUDIO |
| MotionDetect |
| FPS |
| RecordTime |
| Date Input |
| Language |
| Light Freq. |
| Version |
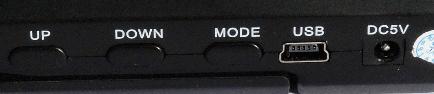
To configure the vehicle video recorder, press [ON/OFF] to start the camera, wait for recording to begin, then press [REC/SNAP] — [MENU] — [REC/SNAP] to obtain the configuration menu. Note: The sequence [REC/SNAP] — [MENU] — [REC/SNAP] is not the one given by the instructions provided with the camera, but seems to be the only way of reaching the configuration menu.
In the configuration munu use buttons [UP] and [DOWN] to choose, and then confirm your choice with the [REC/SNAP] button which will take you into the sub-menu.
To leave the configuration menu, press [MENU] again.
Press [UP] and [DOWN] to chose between 1280×720 (HD) and 640×480 pixels. Press [REC/SNAP] to confirm your choice and leave the sub-menu.
Use buttons [UP] and [DOWN] to chose between "On" to record sound and "Off" to stop recoding. Press [REC/SNAP] to confirm your choice and leave the sub-menu.
The vehicle video recorder contains an image motion detector. If the detector is turned on, the camera will begin a new recording period only if there is movement in the image. Once the recording period begins, it will be completed, but the following recording period will only begin when, once again, motion is detected.
Use buttons [UP] and [DOWN] to choose between "On" to turn on the motion detection, and "Off" to not use this facility. Press [REC/SNAP] to confirm your choice and leave the sub-menu.
The vehicle video recorder creates AVI container files which contain video in the MJPEG format, which is a sequence of independent JPEG images.
Use buttons [UP] and [DOWN] to choose between "10FPS" for 10 images per second, "20FPS" for 20 images per second, and "30FPS" for 30 images per second. Press [REC/SNAP] to confirm your choice and leave the sub-menu.
The vehicle video recorder records a sequence of short videos. You may choose the length of these videos. When the SD/SDHC card is full of these videos, the oldest one will be removed to make room for the latest. This operation takes between 1 and 5 seconds during which time there is no recording. If you choose the HD format at 30 images per second, and a video length of 5 minutes, a full 16Gbyte SD/SDHC card will contain 72 files, which is 6 hours of video.
Use buttons [UP] and [DOWN] to choose between 2, 5 and 15 minutes of video in each file. Press [REC/SNAP] to confirm your choice and leave the sub-menu.
| Set |
|---|
| mm / dd / yyyyy |
| hh : mm : ss |
All the images recoded by the vehicle video recorder are marked with the time and date, which you should set as exactly as you can. Choose "Date Input" in the menu of figure 8 and press [REC/SNAP] to enter the sub-menu.
| Off |
| Set |
The vehicle video recorder presents a time and date change confirmation menu as shown in figure 11. Use button [DOWN], select "Set" et then press [REC/SNAP] to enter the sub-menu shown in figure 12.
Use buttons [UP] and [DOWN] to change the values, and [REC/SNAP] to move to the next field. A final [REC/SNAP] brings you back to the main menu.
| Language |
|---|
| English |
| Русский |
| Português |
| 繁體中文 |
Choose the display language of the vehicle video recorder.
In Europe, specify 50Hz.
Mine shows version V 1004210.
 If you plug the vehicle video recorder
into your computer using the USB cable supplied, the product will
automatically turn itself on and begin charging its internal battery.
The vehicle video recorder will show the well known "USB" logo that you see here on
the right.
If you plug the vehicle video recorder
into your computer using the USB cable supplied, the product will
automatically turn itself on and begin charging its internal battery.
The vehicle video recorder will show the well known "USB" logo that you see here on
the right.
The Windows operating system will present the vehicle video recorder in a window as removable storage (E:). The files containing the recordings are in directory DCIM → 100DSCIM . The videos have names such as REC_0210.AVI and photos have names such as JPEG0214.JPG .
To view the video files I use the excellent VLC software, but other software is capable of presenting the AVI/MJPEG format.
NB : The description of the USB mode given in the english language instructions that came with my vehicle video recorder seem to be incorrect.
Plug the vehicle video recorder into a television set or other "HD" equipment, and the vehicle video recorder automaticcally enters TV playback mode. See the instructions in chapter 6.
Note: The HDMI cable is not supplied. Its up to you to find one.
 |
|---|
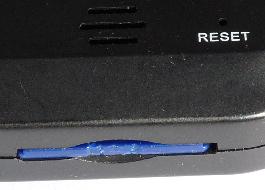
Here is some advice which can be very helpful. The vehicle video recorder behaves as a computer. If it "crashes", you can reset it by pressing gently in the [RESET] hole with a pin less than 1 mm thick. millimètre.
Some personal experience:
It is very easy to accidentally press the ON/OFF [6] button on the side of the camera. It is preferable to hold the camera by the top and bottom rather than by the sides.
 After a few day's use the suction cap drops off the windshield.
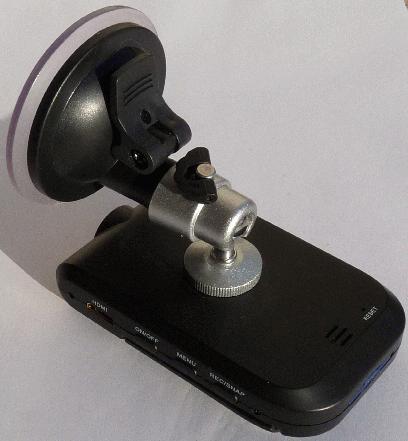
You can get a more permanent vibration-proof attachement by spreading a few drops of thread locker liquid on the suction cap. It is still possible to remove the camera from the windshield. On the right you see the product I use. It's probably useful to protect the suction cap from the harmful effect of sunshine.
Remove the suction cap from the camera and re-attach it with the suction cap lever vertically above the camera while the camera's attachment screw is vertically below as shown in figure 10. To do this, remove the flexible cap. You will find, hidden behind the cap, the screw which allows you to make the necessary adjustment.
The cause is a confusion between the black, grey and clear zones in the file erasure menu. See a detailed discussion of the problem.
There is no SD/SDHC card in the camera.
 |
 |
 This page is in part a translation of the leaflet provided with the
product. My additional material is licensed under the
Creative Commons Attribution-ShareAlike 3.0 Unported License.
This page is in part a translation of the leaflet provided with the
product. My additional material is licensed under the
Creative Commons Attribution-ShareAlike 3.0 Unported License.
This page is distributed in the hope that it will be useful, but WITHOUT ANY WARRANTY; without even the implied warranty of MERCHANTABILITY or FITNESS FOR A PARTICULAR PURPOSE.
© Copyright 2005-2022 Roger Price < webmaster at rogerprice dot org >
In order to facilitate access from all browsers, now and in the future,
these pages conform to the International Standard ISO/IEC 15445 and the
corresponding W3C Recommendations.


Last change: 2022-11-11 13:17:51 https://rogerprice.org/Boite-Noire-Voiture/Car-Video-Recorder.html